Update 13 Dec 2021
I receive a lot of mails nowadays, regarding things that work differently now (/stopped working), than they did when I wrote this post. Unfortunately I don’t have time now to dive deeper in this topic anymore, so please don’t send me questions, most likely you will not receive a reply from me. This blog post will still be left online for archival and who knows it still might be useful for some. With this out of the way, here comes the original post:
Flashing GerdaOS onto the Nokia 8110, installation tutorial
In this blog post we will be exploring how to install and flash GerdaOS custom ROM to replace KaiOS and liberate our device. As a device we will be using a Nokia 8110 4G.
Why do that?
The stock KaiOS ROM has been known to leak a lot of sensitive data about its user, which is quite ironic, because people buying this phone would do so because of privacy reasons. Moreover, the GerdaOS ROM adds much more functionality, easy sideloading of apps being one of them.
Please keep in mind, as mentioned on the Gitlab page, this software is still far away from being stable.
And props to the amazing people, who are dedicating their time and effort to make the KaiOS platform more open and secure, in removing the privacy nightmares from the software. These are the people at banana hackers (whose site is ironically still hosted using google sites, but I am sure they will change that when they have the resources) and of course GerdaOS itself. These people are doing an amazing and very important job!
What we need
- ADB
- Palemoon Browser (for sideloading the root app), you can find it here
- access to a command line / terminal client
- microSD card inserted into your device, with sufficient free storage available
Once you have everything ready, we can move on.
This process will wipe all data, possibly corrupt your device, void all warranty and destroy OTA (over the air) update, so please proceed with caution.
You have been warned.
Achieving temporary root
In order to install the recovery, which is highly recommended on the GerdaOS website, we will need to achieve temporary root access (through a root ADB shell). I have written an in-depth post about how to achieve temporary root access on your KaiOS device, which you can find here. In this case we will be using the method involving Wallace lite.
In order to accomplish root you will need to sideload the wallace.zip or wallace lite .zip file to your device using the Pale Moon Browser. If you have questions regarding the sideloading procedure, I have written another post, which explains how to to sideload and deploy a custom app to your KaiOS device, which you can find here.
Surprisingly, when writing this post and simultaneously writing this blog post I found out, that the Pale Moon browser decided to remove WebIDE from Palemoon, during an update in late 2019. Hence, for the sideloading part, you will need to use an older version of Palemoon which still has WebIDE. You can find it here. Now that we move on, I will assume that you already have temporary root access (which is already half of the work).
Making backups of apps
Before we will be installing the recovery, and after that GerdaOS itself as well, it will be handy to make a few backups. In my case, I will only make backups of some apps. This is, because after installing GerdaOS, we will have no access to the KaiOS store. That is why, it might be a good idea to download all apps you like beforehand, and then back them up.
After installing GerdaOS, we will be able to put those apps back, using WebIE (and sideload them like any other app).
If you want to make more backups, of let’s say user configuration file, you could check out this page, which goes into great detail into how to back everything up.
In this case we will backup two locations, which contain the apps, namely /data/local/webapps, which contain the store apps and /system/b2g/webapps, which contain the default pre-installed apps.
On your command line:
mkdir backups
cd backups
adb pull /data/local/webapps
adb pull /system/b2g/webapps
Installing the GerdaOS recovery
Copying
Now we are getting to the actual installation part:
From the gerda.tech website we will need to download the recovery (at the time of writing it is build version 221edb8) and place it onto the microSD card.
You can also download it locally to your computer and push it with adb:
adb push recovery-8110.img /sdcard/
Live saving backups
After this we will need to do some live saving backups.
Enter the root adb shell (adb shell).
dd if=/dev/block/bootdevice/by-name/recovery of=/sdcard/recovery-backup.img bs=2048
dd if=/dev/block/bootdevice/by-name/system of=/sdcard/system-backup.img bs=2048
dd if=/dev/block/bootdevice/by-name/boot of=/sdcard/boot-backup.img bs=2048
dd if=/dev/block/bootdevice/by-name/splash of=/sdcard/splash-backup.img bs=2048
dd if=/dev/block/bootdevice/by-name/fsg of=/sdcard/fsg-backup.img bs=2048
dd if=/dev/block/bootdevice/by-name/rpm of=/sdcard/rpm-backup.img bs=2048
dd if=/dev/block/bootdevice/by-name/modem of=/sdcard/modem-backup.img bs=2048
All of the commands should be successful, otherwise abort operation.
Verify that you see all of this files on your SD card:
ls /sdcard/
Restoring
By the way, as a side note, if you would need to restore you can run the same commands again, but in the reverse order, so switch the if (input file) and of (output file) parameters.
This makes sense.
Of course, all of those commands should be run inside the ADB shell.
Flashing the recovery
Again, you have been warned for all the catastrophic side consequences the following command might do!
dd if=/sdcard/recovery-8110.img of=/dev/block/bootdevice/by-name/recovery bs=2048
After this command the recovery should be installed.
Installing the main system (GerdaOS)
Download the GerdaOS installer, which also can be found on their website, and place it onto your /sdcard/ as well:
(not in adb shell)
adb push gerda-install-221edb8.zip /sdcard/
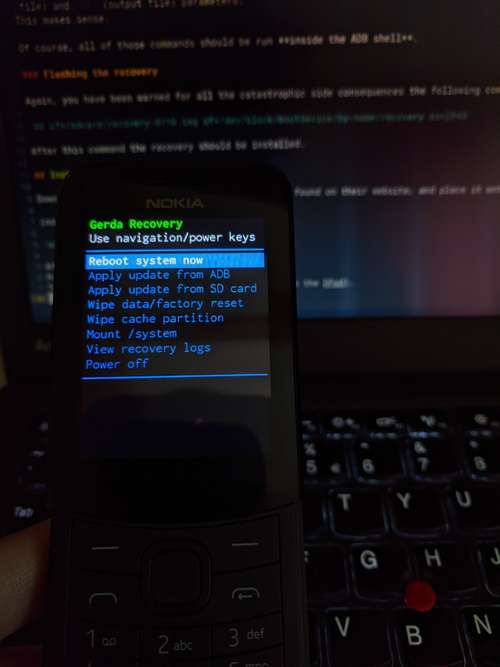
After this, we will need to boot into recovery. Power off your Nokia 8110. Then power it on by holding the up arrow button (on the DPad).

Gerda Recovery on Nokia 8110 screenshot
Select sideload from SD card and the process should start!

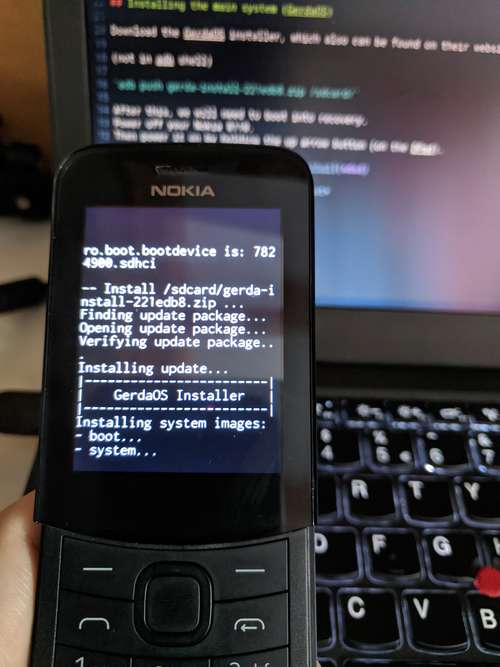
GerdaOS installation in progress
After the installation select “Wipe data/factory reset”. Then reboot!
Afterthoughts
If you look at it, this process was surprising easy and quick, assuming you have all the tools installed on your computer.
In following blog posts I will explore GerdaOS more in-depth (for that, keep an eye on my blog list page).