This post and the next posts will be dedicated to the original Google Pixel phone.
Precisely, in this post I will be explaining how to unlock the Google Pixel and how to flash a custom rom, we will be using LineageOS.
This process is not as simple as it used to be, because of many reasons, including slots and the A/B partition situation with TWRP recovery. For some reason it was difficult to find a clear explanation on how to do it in the year 2019. I remember reading this LineageOS blog post, which helped me a lot. Moreover, this reddit post, explains it quite well, but is complicated. Maybe Google has changed some stuff since this phone first launched, since so many tutorials seem outdated and didn't work for me.
For me it took a lot of tries to figure it out. At one time I even had to return to stock.
By the way, I am not responsible for a bricked phone! Please be careful!
I assume that you have adb and fastboot, plus the drivers correctly installed on your computer. If you need more help with that take a look at
this tutorial on XDA developers.If you already tried to flash something, it would make sense to return your Google Pixel back to stock completely (and discover the reason why a custom rom is so much better haha). Personally, I started from the February 2019 stock situation.
By the way, returning your Google Pixel to stock, re-locking and un-rooting it, is not that diffecult. This Google site does a very good job explaining how to return your Google Pixel to stock, whilst removing root, and locking it.
Anyway, starting from the stock, un-unlocked and un-rooted situation:
First of all, setup the phone like normally, with a passcode (if you use the fingerprint scanner, you will be prompted for a passcode fallback). Actually, what happens, is that the storage is encrypted with your passcode.
Then enable developer options, by tapping on the build number (in settings) lots of times, and enable (inside the developer options) OEM unlocking. Also enable USB debugging.
Now reboot to the bootloader by runningadb reboot bootloader from the command line of your computer.
With your device connected run fastboot flashing unlock on the command line of your computer and confirm the messages. Now reboot the phone. You will need to setup the phone again. Also, use a passcode, same as before.
We are not done yet!
How to flash LineageOS on the Google Pixel
On your computer download the TWRP recovery. With my method, you will only need the .img file. Actually, this method is documented in this lineageos blog. At the time of writing it is the file twrp-3.3.0-0-sailfish.img . The nice thing is, that TWRP now supports decryption of the device storage.
But hang in there, because now we will have to deal with "slots".
Also, in your working directory, on your computer, download the other files you will need, mainly the lineageos .zip file for the Google Pixel (which has the nickname "sailfish" by the way). Optionally, if you want root access, you will also need the addonsu zip from here. Also, optionally, you can download the Google Apps .zip.
Both OpenGApps and MindTheGApps should work with this method, at the time of writing.
Reboot to the bootloader again, with your Google Pixel connected runfastboot boot twrp... .zip.TWRP will ask for your password, just enter your passcode (this will happen each time).
First of all, make a full wipe (go to advanced, wipe and wipe all). Then reboot to bootloader and boot TWRP (temporarily) again (with the same command as before). You will need to repeat the rebooting of the recovery many times, it has to do with slots. Basically, this is what the lineageos blog was saying. So hang in there!
When you are in TWRP again (2nd time) push the lineageos.zip using adb push lineageoszip.zip /sdcard/ . The /sdcard/ doesn't depict any physical sd-card, its just an android convention. Now install the zip normally, like you are used to. DO NOT REBOOT THE SYSTEM!
Reboot TWRP again (reboot to bootloader, and fastboot boot twrp.img, you get the idea). Now (during the 3rd time) push the GApps .zip (optionally) and install the .zip. You will notice, that all files appear to be missing, also the lineageos.zip, which you have pushed previously. Again, boot to bootloader, and boot TWRP, for the last time in order to install the addonsu.zip (4th time).
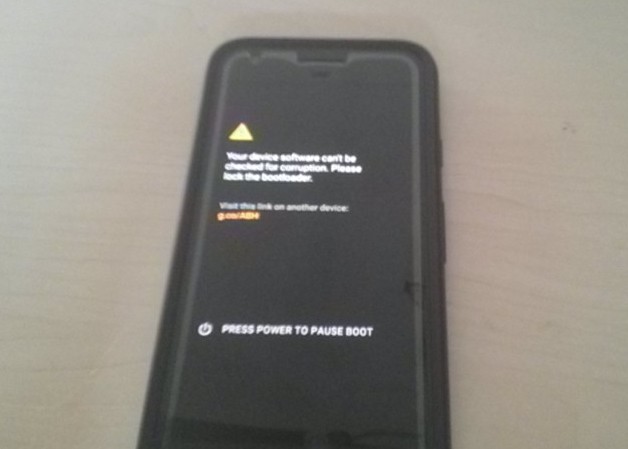
Now you may reboot the system. You will notice, that every time you boot the system you will see a very ugly warning by Google.
Also, the TWRP recovery is not installable permanently anymore. So every time you want to flash something, you will need to temporarily boot it again.